Saturday, September 29, 2018

Happy Fall!

Fall is here, and I  have to say that the majority of people I know love Fall more than any other season. If I am being honest, Fall doesn't necessarily mean cooler weather and changing colors in Houston, but that doesn't stop us from enjoying the season. All things pumpkin spice, fall decorations, and all the delicious food during this season are part of our every day too. It has been raining a lot during these past days and rainy weather is perfect for crafting and diying. I love going to the dollar stores and searching for inexpensive items that I can turn into beautiful decor for my house or for someone I love. Just by adding a little ribbon and some gold, you can turn anything into simple but yet adorable decor. I spotted these table placemats at the 99 Cents Only Store, and I immediately thought, "hmmm, lets add some ribbon to these and give them a little make over" and I just loved the way they turned out.


Most of the materials I used for this project were used either at the 99 Cents Only Store or at the Dollar Tree. I found this beautiful burlap ribbon roll at the 99 Cents Only Store too. It had a lot of material for just .99 cents and I didn't even use it all.


The placemats are a little thin so I decided to attach a layer of shelf liner from the Dollar Tree so that they will stay in place. 

I just glued it to the back of the placemat with hot glue, and done! 


Moving on to the fun part, the ribbon!! this part was a little tedious and time consuming but well worth it because it really makes the placemats look like they were bought at one of those fancy home decor stores. 

I measured 2" strips and cut them carefully, following the texture line on the burlap. 


Each little strap measured about 17 inches long. I was able to obtain three from the with of the burlap ribbon, and used two for each placemat.   


Now, the time that took most time. The little folds. I made folds that measured about 2 cm.


Continued folding adding one small dot of hot glue to the bottom of each little fold until I folded the whole strip. 


I know it might seem complicated in the beginning, but it looks absolutely beautiful and I didn't even need to saw or use a sawing machine. It really is a project that anyone can do! Once I finished folding and all the strips I glued them to the back of the placemat trying to attach them as straight as possible.


And just look how gorgeous they already look!! But I still wanted to add a little more fall glam, and I thought, "hmmm.... some gold would look perfect with this color combination!" I used a fall leaf shape that I cut using my Cricut machine and use it as a stencil.


Using a little bit of gold acrylic paint and a thin paint brush, I traced the shape of the leaf on the corner of the placemat. 


Very simple but darling!! 


I simply love making inexpensive things look beautiful! The placemats look super cute, I love the fall colors and the little touch of gold makes them stand out so much more. These type of projects are exactly the reason why I enjoy crafting so much. There is a special beauty in making things look adorned and fabulous. 


Happy Fall, everyone!! 


Sunday, January 28, 2018

Love Month!

WOW!! 2018 is here, and it is almost Valentine's Day. The holidays are such a busy time and I feel like January is always a little period of time to relax and recover from all the stress from the Christmas season. My family and I took a little trip to Ruidoso, New Mexico and it was just perfect! It allowed me to take a break, breath and enjoy the quiet of those days in the mountain. We had such an amazing time!


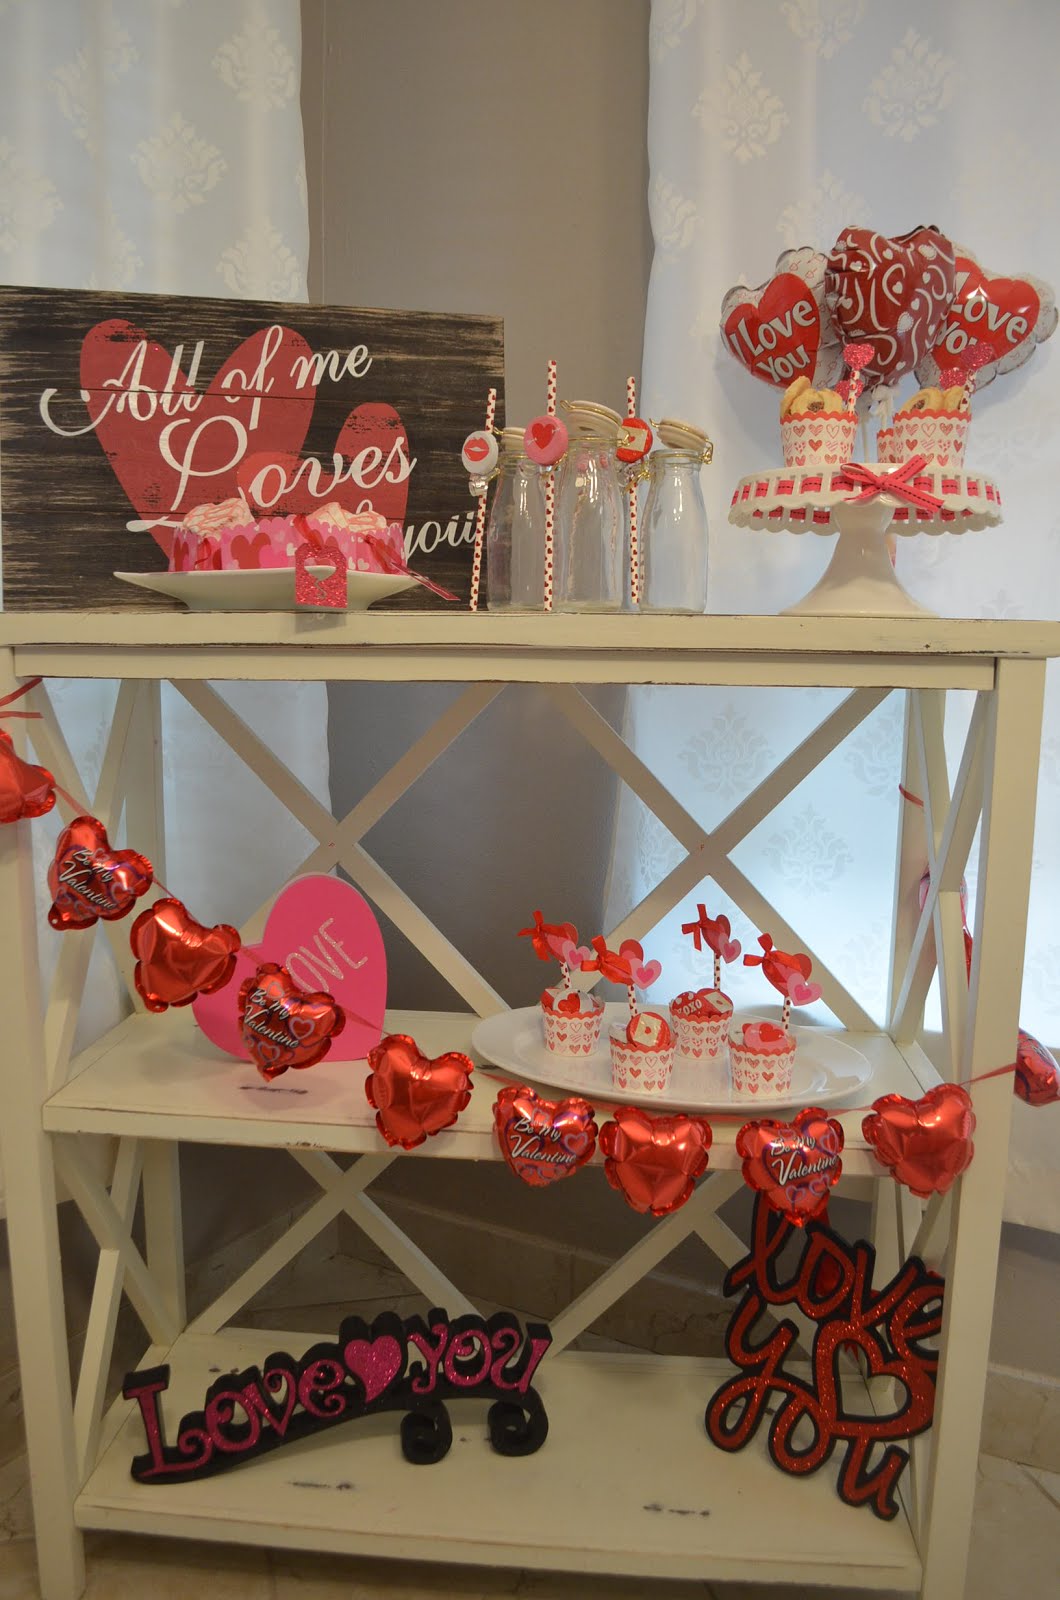
After our little road trip, I felt very recharged and ready to take on 2018 with the best possible vibe. January has already been a great month for my little family and every day is a reminder of how blessed we are to have the beautiful life we have. With that being said, I am ready to welcome February with a grateful heart, fulfilled with love. Valentine's day gives us an opportunity to celebrate love. Yes, love should be the focus of our life 24/365, but February is the month were we take our celebration of love to the next level, with tons hot pink and red balloons everywhere! Chocolates, cookies, and delicious treats. With stuffed animals and flowers, and everything that symbolizes the romanticism in our lives. I am blessed to be married to a man who loves me and tries to show it as often as he can, but I am also grateful for my son's love, for my little pugs' kisses, and I love to feel surrounded by Valentine's vibes everywhere, especially in my house.


When it comes to making life a party, I believe in decorating everything!! Let's make every detail of our days a party. Ribbons, balloons, garlands, tassels!!! 


I love to make every celebration as festive as possible. Who ever said that only cakes and cupcakes can have toppers. Look at how adorable these cupcake cups filled with cookies look with a cute topper made with a straw I cut in half and a heart cutout that I made with my Cricut  machine.


I think they look absolutely adorable all dressed up. 


How amazing is it to make something so simple look so pretty! 


I just love these little milk bottles, perfect to pair with the cookies. I used the same straws that I bought at 99 Cents Only store and glued a little chocolate also found at the same store.


A simple chocolate added color and simple embellishment. So cute!!


I also found these little boxes at the 99 Cents Only Store and I just couldn't resist buying them. They have such adorable decorations. I use my Cricut machine to cut out these beautiful Valentine's Day tags. The images were free this week :)


Adding a simple decoration could make anything look lovely, sometimes, it looks so pretty, you don't even want to eat it!


In reality, it is not hard at all! Adding details to your food, drinks, and treats for your celebration could be effortless and make a huge difference on your set ups for any gatherings.


Just like these little cups with chocolate I made. Simple, uncomplicated, but so, so pretty! 


Oh! how I love making little things look beautiful!!


I fell in love with this mini foil balloon garland I made. I used these self-inflatable mini balloons I got from Hobby Lobby. 


I hot glued them to a ribbon. Look how festive and pretty it looks!!


"I am in love" with how it looks! You can make the exact same garland for only $3.59!


Love is in the air ;)


 Have I also mentioned how much I LOVE Hobby Lobby?! They have the most beautiful decorations for every single holiday and for home decor. 


Looking for unique, beautiful decor? Hobby Lobby, super definitely!!

I hope everyone has a February filled with love and romance with the company of those who make your life filled with hearts. XOXO


Wednesday, November 29, 2017

Rustic Mini Christmas Tree

Oh happy Christmas days!! as soon as Thanksgiving is over, the joy of Christmas flows everywhere. My house has been completely transformed for the season. I have so many projects I want to work on and I hope I get a chance to share them with you. I always see beautiful Mini Christmas trees at the stores and I want to buy them all. I see inspiration everywhere and this time I decided to create my own. And guess how much I spend on this gorgeous rustic tree? not more than $1.00, since I already had glue sticks and some of the other materials at home. Yes, that is all I spent on this beautiful project.


I used a cardboard box that I got from my job and cut a piece big enough to make a cone.


To facilitate the process, I removed one of the layers. This made the folding or wrapping a lot easier.


I shaped the cardboard in the form of a cone and secured it with duct tape, then I used hot glue to make sure it was perfectly glued.


I bought these raffia from the Dollar Tree. One little pack of three was just enough to cover this tree that measured about 20 inches long. It looks small in pictures but it was a good size.


With the help of hot glue I layered the raffia as flat as i could and began the wrapping process. I added a little bit of ribbon thinking it would be needed, but it really wasn't. At first, the raffia might seem intimidating because you will probably feel that it goes everywhere, but if you hold it together, you will realize that it is actually very friendly to work with.


Sorry about my hands, those are the hands of a crafty mom :(


Continue wrapping the cone with the raffia all around it. 


Don't loose patience! it will look beautiful, I promise. 


After you finish the whole tree, you might notice a couple of empty spots or some thin raffia strings in some areas, just wrap a little more raffia and cut the strings.


Done!! I love the way it already looks. This is perfect if you want to just leave it like this and maybe add a little ornament or star on top to embellish it. 


I wanted to add a little bling, because of course, Christmas! So I used some of these little rhinestones that I already had to put around the tree and these pretty poinsettia that I have left from my previous project. 


And there it is! It turned out so incredibly beautiful and for almost nothing! just a little patience :)


I know the tone of the raffia rolls were a little different but I think that is still ok. I really like the way it turned out. It loos so beautiful with the rest of my Christmas decorations.


And this is why everyone loves Christmas, all the glitter, the gold, and all the beautiful decor. Thank you so much for stopping by! 


WIKED, BEWARE, SPOOKY!!

My favorite holiday is here, I mean, Halloween pretty much begins as soon as summer is over am I rite? at least it does for me, and I kno...