Wednesday, July 26, 2017

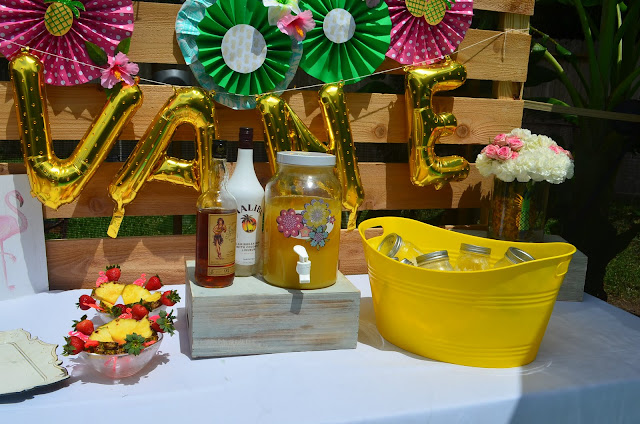
Pina Colada Bar for Vane!

Enjoying summer to the fullest! Yes, I am a huge summer fan. I love sunglasses, bathing suits, pool floats, gatherings and of course, drinks. When I think of summer days by the pool, I always picture myself wearing a cute swimsuit holding a margarita or a pina colada while I enjoy the sun. A pina colada is one of those pretty drinks and a hot-day favorite because of its tropical combination of delicious pineapple and coconut. Nothing says fun summer like a gorgeous pina colada! This weekend I enjoyed the company of some of my closest friends who I can pretty much call my family. We got together to celebrate my beautiful friend's birthday. We enjoyed a perfect Texas sunny day by the pool. I put together a super fun Pina Colada Bar to celebrate this special day. Yes, you read that right... Pina colada bar!! I thought this was a really nice idea. I've seen sangria, mojito, mimosas, and margarita bars and I thought, "hey, there has to be a version of this gorgeous tropical drink." Let me tell you step by step how I put together this idea. It really is less complicated than I thought it would be, without mentioning how much fun I had putting it together and how many compliments we received on it.

The first step, the coconut base. A pina colada is usually a frozen blend. I wanted to enjoy the company of my friends without having to worry about making one drink at a time. And this is the reason why I am obsessed with all these clever drink bar ideas. I came up with a frozen coconut cream with only three ingredients. Cream of coconut, heavy whipping cream and condensed milk. Yes, that is it.
 

Combine together a can of cream of coconut and half a can of condensed milk. Put a mixing bowl in the freezer for about 20 to 30 minutes before you mix it. 


Whisk the cream on high speed until stiff picks form.


Now, just fold the cream together with the cream of coconut and condensed milk until they are well combined. 


Cover with plastic wrap and freeze overnight or for a minimum of 4 hours.


After following these simple steps, you will have a sweet and perfect frozen cream of coconut. yes, perfect for pins coladas!!


I put the frozen cream in mason jars filled up to about half of the container. I covered the jars and put them in the freezer for another two hours or so.


A pina colada just wouldn't be complete without a colorful and tasty garnish. I used this super cute flamingo stirrers to add even more color to our drinks. 


I used a small pineapple triangle and a small strawberry.


Aren't they the cutest and funnest?? Yes they are! 


And here they are, our delicious frozen cream- filled mason jars!


Please, let us not forget the star of the Bar, yes ladies and gentlemen, RUM! delicious, rum! along with probably one of his most popular partners, pineapple juice. 


Our guest could put together a delicious pina colada in seconds just by pouring juice and rum on a delicious frozen cream. A mason jar is so versatile that it even works as a drink shaker and I absolutely love this!!!


We had an excellent day and my friend loved the pina colada Bar, especially set up to celebrate one more year of fabulous. Happy Birthday Vane!!!


Sunday, July 16, 2017

Ice Cream Cakes!

Sundae Funday!!! Happy National Ice Cream Day! What a perfect opportunity to enjoy this yummy treat. I declare myself a HUGE fan of ice cream. I love it, you can find it in tons of delicious flavors, colors, presentations and even themes. You can also dress it up and make it even more delicious! I mean, who doesn't love a super pretty sundae with your favorite ice cream covered with sprinkles, or how about a fancy banana split? There are so many possibilities. One of my favorite ice cream treats is an ice cream cake. What a perfect combination? Whoever came up with the idea is a genius! Ice cream cake is a mix of celebration and deliciousness. I wanted to make my own ice cream cake at home to enjoy with my family on this Sunday, perfect to celebrate and enjoy our creamy friend. Since ice cream is so colorful and full of joy of you ask me, I wanted to do something a little different and decorate it with edible gummy garlands. Not only is this yummy but also colorful and super easy.
 I present to you, my version of a festive and colorful ice cream cake! 

The ingredients that I used are super basic and not expensive at all. I made two cakes because I wanted to have a two flavor cake. I used a chocolate and a vanilla cake box. I used Neapolitan, vanilla, and chocolate ice cream flavor. Any flavor of ice cream will work perfectly, choose your favorite! 

Follow the box instructions for the cakes. Nothing complicated here. I used round cake pans because I figured these would work best since I wanted to add different layers. 


Lining the cake pans with parchment paper is the best technique to avoid your cake from sticking to the pans. Measure the circles needed the pans, cut, grease the pans with a little butter or margarine and line each one of the pans you will  be using. 


Pour the cake batter according to the way you want your cakes. And bake them according to the instructions on the packaging. 


After the cakes are done, let them cool while we work on the ice cream layer. Now, to ensure a clean release for the ice cream layer, we are placing plastic wrap inside the same cans that you used for the cake. This is to obtain the same layer size.


Put your choice of ice cream on each of the cake pans.


You want to put the pan with ice cream back in the freezer for about two or three hours to make sure the ice cream stays in place. While we wait for it to set, let's make a few yummy decorations!


I bought a few colorful and cute looking gummies to create fun edible garlands. Feel free to let your creativity run wild. 


The easiest way to make this was using needle and thread. I sterilized the needle and washed sections of never used before thread. 

Tie each end of the garland to a straw.


Passing the needle with thread thru each gummy making sure I passed the needle thru the same spot on each gummy until it was the length I wanted.


Watch out for sneaky gummy-thiefs! :)


How extremely cute are these edible cake toppers??? Not only are they super easy to make, but they are also colorful and yummy!! 


Your cakes should be completely cooled down and your ice cream must be frozen again. Let's layer our cake!


Place your first layer of cake on a cake stand or the base of your choice. 


Next, the ice cream layer.


The plastic wrap helps a lot!


I liked the way my cakes looked naked. I didn't feel like I needed to add any frosting. I just added a little cool whip on top of the last layer.


They don't need to be perfect, I guarantee you no matter what they will be delicious! I mean, we are talking about ice cream and cake! Need to say more?
Now, we can place our little cake toppers on the cake.


I absolutely love them!!!

Making these ice cream cakes was fun! I love making things that are delicious, full of color but at the same time easy and uncomplicated, especially when my main intention is to enjoy them with my family. I hope you have a Happy National Ice Cream Day! 

Saturday, July 8, 2017

Ocean Life Snow Cones

My first Post!!! And I am very exited to begin sharing all my ideas with you! Summer is my favorite season and I love anything that has to do with the beach, pools, out door activities, the food, cocktails, and cold treats. For my first post, I wanted to do something with my ten year old, where he would have the opportunity to be part of the beginning of my blogging adventure. We love colors and anything that gives us the chance to chose from different flavors and ideas. We decided to make snow cones based on sea creatures and it was SO MUCH FUN!! We laughed a lot and enjoyed tryingdifferent flavors before we chose our favorite ones. 

My family has the luxury to have a pool and we particularly enjoy spending hours in the sun. Every time we have the opportunity, we spend the entire day in our backyard and that is the reason why we are always coming up with different ideas for foodies and treats to enjoy outside. Of course Pinterest is a lot of help. For this particular treat, Pinterest has tons of recipes on how to make your own snow cone syrup. Of course you can always buy them ready at the store, but I wanted to chose my own flavors to go with our ocean theme and the snow cones we wanted to create based on sea creatures. I made my snow cone syrup with KoolAid, sugar, and water. Yup! Super simple! I used two cups of water, 2 cups of sugar, and three little packets of KoolAid. Of course you can add more sugar if the KoolAid flavor is too sour for you. Two cups of sugar for each two cups or water and three packs of KoolAid was just right for us. The flavors I used were grape, orange, strawberry, and blueberry. These were the flavors that went perfect for our theme.


I bought little sauce dispensers for each flavor to make pouring easy. Making them was easy and quick.


To make my "shaved ice" I wanted to keep things simple as well. I don't have a snow cone machine. Yeah, I know... loving summer as much, I should've already bought me one!! But hey, I have a blender and crushing ice takes seconds! I didn't have to spend on a machine. :) this means you can do this set up without out spending tons on it. I crushed my ice on the blender and placed it inside a tin can, which keeps ice from melting faster. If you have a plastic container it should work as well. I do advice you to blend your ice and keep it in the freezer until you are ready to make the snow cones.


My set up is super simple. I have a little umbrella in one of the corners of the pool and decided to place a little table next to it for that summer feeling. I made a colorful banner with my cricut machine (which I am very obsessed with by the way) a white table cloth, some of our pool toys and what I needed for our snow cones.


And now, our Sea Creatures themed snow cones flavors!!


I bought a chalkboard scrapbook paper from Hobby Lobby and cut it in four parts for the flavors. Again, keeping it simple and affordable. 

These were my son's ideas and I loved them! They are fun, creative and super yummy! And of course, the ocean theme continues to give us that summer feel we love! 

The Kraken

-Blue Berry 
-Grape
-Kraken gummy 


The Mermaid

-Strawberry
-Grape
-Pink and purple nerds candy


SHARK! 

-Blueberry
-Strawberry
-Shark gummy


Last but not least...

Jelly Fish 

For the jellyfish my son considered it would be a great idea to have a "create your own" flavor. Jellyfishes come in all kinds of colors, so I thought this was just perfect! We thought the crawler gummies could look like jellyfish tentacles ;)


My son and I had tons of fun trying all the flavors and coming up with the combinations. This activity gave him the idea to have an Ocean Theme Birthday Party, and how perfect would these snow cones combinations be?!! I love the idea of combining flavors, colors and toppings for snow cones because there are endless possibilities! You can make them for any themed party, like super heroes,  matching each of their colors. How about Dinosaur Land?! or Even Princesses! They are simple, not expensive at all, colorful, easy for kids to make their own and super yummy! I hope you enjoyed my first post! Stay tuned for many more ideas to come!! 


WIKED, BEWARE, SPOOKY!!

My favorite holiday is here, I mean, Halloween pretty much begins as soon as summer is over am I rite? at least it does for me, and I kno...